
Scope of this technical record
Workflow for Danfoss VLT overvoltage during deceleration, quick stop or lowering where the service decision must separate line voltage, load regeneration, ramp setting, brake resistor capacity, brake chopper operation and DC-link sensing.
Do not change ramps or brake settings in a way that compromises machine stopping safety. Load movement, DC-link voltage and brake-resistor heat are all hazardous conditions requiring qualified procedure.
Danfoss deceleration-overvoltage workflow route
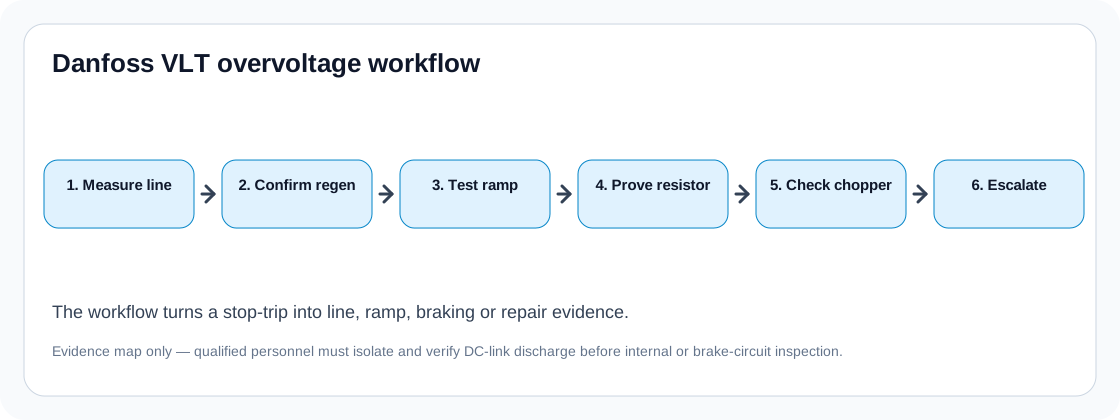
The workflow turns Alarm 7 into a service decision instead of a generic reset-and-try-again fault.
Danfoss VLT brake-path workflow
Workflow outcome
The workflow should end with one of five outcomes: line-side voltage correction, ramp/process change, braking-resistor sizing or wiring correction, brake-chopper hardware investigation, or DC-link sensing/control repair. If the output is simply “overvoltage fault,” the evidence package is incomplete.
Step 1 — prove line voltage first
Measure the input phase-to-phase voltage at the drive terminals. Danfoss service guidance for DC-link overvoltage includes checking whether input phase-to-phase voltage exceeds the limit. If the line is high, solve the line-side condition before interpreting the stop event as a brake failure.
Step 2 — confirm the regenerative event
Record whether the event occurs during deceleration, quick stop, load lowering, an overhauling section of a conveyor, or a high-inertia fan/pump coast-down. A real regenerative event should have a mechanical explanation for why energy is entering the DC link.
Step 3 — use ramp change as evidence, not as a blind fix
Where safe, increase the deceleration time or alter the stop profile and observe whether the alarm changes. If it clears, the drive may be healthy while the original stop requirement exceeds the installed braking capacity. The repair decision then becomes process/ramp/braking hardware rather than board replacement.
Brake-path workflow stop points
| Finding | Likely decision | Stop condition |
|---|---|---|
| Alarm clears with longer decel | Regeneration exceeds original ramp | Do not replace board without brake-capacity review |
| Resistor overheats | Duty or placement problem | Stop before repeated thermal trips |
| No brake option present | External brake package or ramp change | Do not order only a resistor |
| Chopper option present but no brake action | Chopper command / transistor investigation | Do not energise after visible chopper damage |
| Line and brake evidence proven good | DC-link sensing/control boundary | Escalate with complete evidence package |
Step 4 — document the physical brake path
Photograph the brake terminals, resistor label, resistor mounting, cabinet airflow and any thermal-contact wiring. Measure resistor value only after isolation and discharge verification. If the resistor is cabinet-mounted, heat becomes part of the evidence: a resistor can reduce DC-link voltage while creating a new thermal problem in the panel.
Field record checklist
- Input phase-to-phase voltage at the drive
- Stop event timing and machine load description
- Original and test deceleration ramp values
- Brake option/chopper presence
- Resistor ohms, duty and thermal-contact evidence
- Photos of brake wiring and cabinet placement
Technical basis and reference documents
This is an independent editorial technical reference. Original manufacturer documentation remains controlling for installation, repair and commissioning decisions.
Defines Alarm 7 / DC-link overvoltage checks around input phase-to-phase voltage and regenerative voltage from the motor end.
Describes brake-resistor function as absorbing brake power generated in regenerative braking and supports the brake-energy route used here.
Explains why external brake-resistor placement can improve heat handling, duty-cycle selection and braking-energy dissipation.
Linked records
The DC link is being charged faster than the drive, ramp setting, brake chopper, braking resistor, line condition, or DC-link feedback path can control. The first split is line-side overvoltage versus load-side regeneration.
Routes Alarm 4, undervoltage and deceleration overvoltage through the same energy path: L1/L2/L3 input, fuses, contactor, rectifier, DC-link capacitors, brake chopper, braking resistor and DC-link voltage feedback.
Routes a Danfoss VLT deceleration-overvoltage case through regenerated load energy, ramp settings, DC-link rise, brake-chopper availability, resistor value, resistor thermal contact, wiring and hardware repair boundary.
Turn this record into a qualified service request
A repair decision is much more reliable when the request includes the exact identity of the drive, the first fault evidence and the machine condition when the symptom appeared.
- Complete drive type code / MLFB or nameplate model
- Fault code, fault value and first event before reset
- When the event appears: power-up, enable, ramp, run, decel or stop
- Motor/cable connected or isolated during the symptom
- Visible board, option-card, module and connector identifiers
- Previous repair history, replacement parts and repeat-failure pattern