
Scope of this technical record
Workflow for Danfoss VLT Alarm 4 cases where the technician must prove the actual input supply at the drive, separate upstream protection faults from line sag, and decide when rectifier or DC-link sensing investigation is justified.
This workflow requires qualified live-voltage work at the drive input and qualified isolation for internal inspection. Stop if the measurement cannot be made safely or if a missing phase, overheating fuse holder or damaged contactor is found.
Danfoss Alarm 4 workflow route
The workflow separates upstream supply faults from rectifier or DC-link sensing evidence.
Danfoss Alarm 4 workflow image
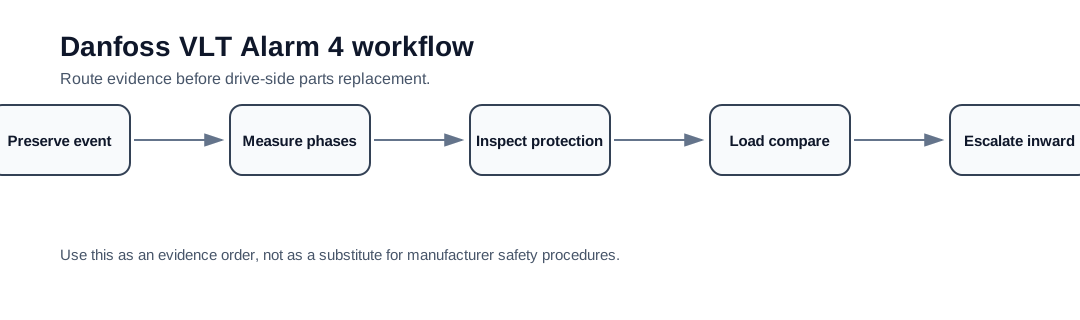
Workflow outcome
The workflow should end with one of four outcomes: upstream supply correction, protection/contactor/terminal repair, plant line-sag mitigation, or drive-side rectifier/DC-link sensing investigation. If the outcome is only “Alarm 4 present,” the evidence package is incomplete.
Step 1 — preserve the event condition
Record whether Alarm 4 appears at power-up, when ready is requested, at run command, during acceleration or when another plant load starts. If the alarm is intermittent, the condition that makes it appear is the evidence: a cold start, hot contactor, heavy load or post-maintenance wiring state.
Step 2 — measure at the drive, not only upstream
Measure all three phase-to-phase values at the VLT input terminals with the drive in the alarm-producing state. A healthy upstream bus does not prove the drive input is healthy. Loose lugs, fuse clips, disconnect poles and contactor contacts can produce a missing phase only under current flow.
Step 3 — inspect the protection path
Inspect line fuses, disconnect, contactor, line reactor and terminals for heat, discoloration, looseness and single-pole failure. Record photos before retightening or replacing parts. If a single phase is missing or weak, correct the field supply route before discussing internal drive repair.
Alarm 4 workflow stop points
| Finding | Action | Do not do this |
|---|---|---|
| One phase absent at drive input | Repair upstream phase path | Open the drive looking for a board fault |
| Voltage balanced upstream but not at drive | Inspect fuses, disconnect, contactor and terminals | Assume the incoming supply is proven |
| Voltage sags with other plant load | Investigate plant supply and loading sequence | Quote a drive without line evidence |
| Voltage stable at drive under fault condition | Escalate to rectifier/DC-link sensing evidence | Skip the supply evidence in the support request |
Step 4 — build the drive-side evidence package
If field evidence is stable, the repair request should move to rectifier input, DC-link ripple or sensing path. The request must include the exact drive type code, voltage class, input measurements, protection-path photos and the condition that triggered Alarm 4. That information determines whether the next step is field correction, workshop repair or replacement planning.
Field record checklist
- Alarm 4 timing and reset history
- Three phase-to-phase readings at the drive input
- Fuse/disconnect/contactor terminal photos
- No-load versus loaded readings
- Any recent panel or wiring work
- Drive-side evidence only after supply route is proven
Technical basis and reference documents
This is an independent editorial technical reference. Original manufacturer documentation remains controlling for installation, repair and commissioning decisions.
Used to anchor Alarm 4 as a mains phase-loss check, Alarm 29 as a drive over-temperature check and DC-link overvoltage as a supply/regeneration/brake-path issue.
Used to keep Alarm 29 diagnosis focused on real heatsink temperature, airflow, fan condition, ambient temperature and load before sensor or board conclusions.
Used as public VLT-family context for heatsink temperature alarm wording, high-voltage safety and FC-family drive service boundaries.
Linked records
One or more input phases are missing, low or unstable, or the drive input sensing/DC-link ripple indicates a phase problem.
Routes Alarm 4, undervoltage and deceleration overvoltage through the same energy path: L1/L2/L3 input, fuses, contactor, rectifier, DC-link capacitors, brake chopper, braking resistor and DC-link voltage feedback.
Turn this record into a qualified service request
A repair decision is much more reliable when the request includes the exact identity of the drive, the first fault evidence and the machine condition when the symptom appeared.
- Complete drive type code / MLFB or nameplate model
- Fault code, fault value and first event before reset
- When the event appears: power-up, enable, ramp, run, decel or stop
- Motor/cable connected or isolated during the symptom
- Visible board, option-card, module and connector identifiers
- Previous repair history, replacement parts and repeat-failure pattern