
Scope of this technical record
Danfoss VLT Alarm 14 earth-fault route for deciding whether the trip comes from motor winding leakage, motor cable damage, moisture, output-terminal contamination, shield/PE routing, current-sensor bias or a drive-side output-stage fault.
Do not insulation-test through the VLT output. Disconnect and isolate the motor circuit correctly before megohmmeter testing. Verify DC-link discharge before internal inspection and do not use repeated resets as a method to locate a ground fault.
Danfoss Alarm 14 earth-fault route
Alarm 14 must be proven through motor/cable behaviour before current-sensor or output-stage repair.
Danfoss Alarm 14 earth-fault decision image
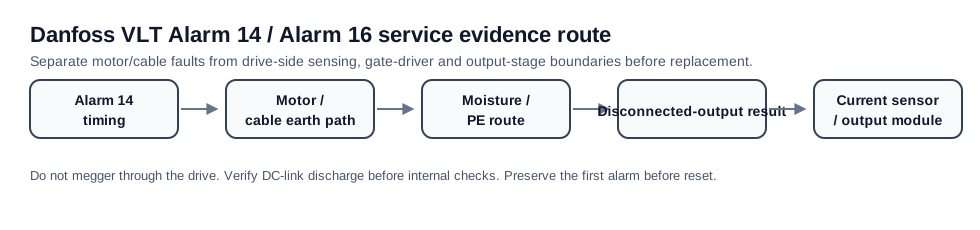
Service decision coverage
Alarm 14 users need to know whether the earth fault follows the motor/cable or remains inside the drive current-sense/output path.
| Observed situation | Decision needed | Evidence that satisfies the case |
|---|---|---|
| Alarm with motor connected | Motor or cable insulation | Insulation readings and terminal photos |
| Alarm after rain/washdown | Moisture route | Environmental pattern and cable gland evidence |
| Alarm with output disconnected | Drive-side boundary | Disconnected-output result and current-sensor route |
Alarm 14 is an earth path, not a board diagnosis
Alarm 14 is often checked after a drive reports earth fault even though the plant needs to run immediately. The common mistake is to assume the current sensor or power module is faulty before proving the external output path. Danfoss support material places Alarm 14 on the motor/cabling side first; only after that boundary is proven does drive-side sensing or output hardware become the leading route.
The practical question is where the leakage path exists. A wet motor terminal box, damaged trailing cable, crushed conduit, long shielded cable, poor gland sealing or conductive contamination can all produce a convincing Alarm 14. A drive-side current-sensor or module case normally becomes credible only when the external path is disconnected at the drive and the alarm behaviour is documented under a qualified procedure.
Classify Alarm 14 by timing and environment
Timing is the first diagnostic clue. An earth fault at first enable, after washdown, after rain, during a specific machine movement or after a power-module repair does not mean the same thing. Record the first event before clearing it; the evidence is often lost after repeated resets.
Alarm 14 timing map
| Alarm 14 pattern | Likely first boundary | Evidence to collect |
|---|---|---|
| Appears only with motor connected | Motor winding or motor cable to earth | Insulation result, terminal-box condition, cable route photos |
| Appears after washdown / rain | Moisture path or cable gland failure | Environmental timing, enclosure/gland photos, drying comparison |
| Appears at first enable before load | Output cable/terminal leakage or sensing offset | Output terminal contamination, cable removed result, alarm queue |
| Appears only at certain movement | Flexing cable or machine-ground path | Cable chain position, motor lead stress, movement-specific repeatability |
| Remains with output isolated | Drive-side current-sensor or output-stage boundary | Safe disconnected-output result and internal evidence package |
Field checks before drive-side repair
Alarm 14 checks should begin outside the drive. Inspect the motor terminal box, motor cable glands, cable run, shield termination, output contactors and terminal contamination. Insulation testing must be performed only after the motor and cable are correctly isolated from the drive electronics. The goal is to decide whether the fault follows the external circuit or remains with the drive.
If the alarm clears when the external output path is removed, replacing the VLT does not solve the root cause. If the alarm remains with the output disconnected and the procedure is documented, the case moves to current-sensor offset, output module leakage, gate-driver damage, power-board contamination or previous repair quality.
- Photograph output terminals before moving wires
- Record whether the alarm is present with motor leads installed
- Test motor and cable insulation only after correct isolation
- Compare cold, wet, dry and warm conditions if the fault is intermittent
- Stop powered trials if the alarm remains with the external path removed
When Alarm 14 becomes a repair request
A drive-side Alarm 14 repair request should include more than the alarm number. It should include the disconnected-output result, current-sensor or output-module evidence, frame size, previous module changes and whether the alarm was immediate or temperature-related. That information determines whether the likely repair boundary is sensing, gate-driver, output module, contamination or control electronics.
Drive-side escalation evidence
| Evidence area | Why it matters | Weak request |
|---|---|---|
| Disconnected-output result | Separates external leakage from internal sensing/output fault | Alarm 14, motor removed somewhere, unclear where |
| Current-sensor route | Persistent earth indication can be a sensing problem | No photos of sensor or board path |
| Module / output bridge evidence | Leakage or partial failure may remain after a prior event | Only the code, no static evidence |
| Repair history | Repeat failure risk depends on what was changed | New module fitted, no cause review |
Field record checklist
- VLT type code and frame
- Alarm 14 first-fault timing
- Motor connected/disconnected result
- Motor and cable insulation evidence
- Moisture/washdown/environment pattern
- Output terminal and current-sensor photos if escalated
Technical basis and reference documents
This is an independent editorial technical reference. Original manufacturer documentation remains controlling for installation, repair and commissioning decisions.
Used to anchor Alarm 14 around motor/cabling isolation and the boundary where current-sensor or drive-side investigation becomes relevant.
Used to anchor Alarm 14 as short-to-ground in motor/wiring and Alarm 16 as line-to-line short circuit in motor/wiring.
Used as FC-family public manual context for alarm wording, DC-link safety and output-side service boundaries.
Diagnostic workflow
Turn this record into a qualified service request
A repair decision is much more reliable when the request includes the exact identity of the drive, the first fault evidence and the machine condition when the symptom appeared.
- Complete drive type code / MLFB or nameplate model
- Fault code, fault value and first event before reset
- When the event appears: power-up, enable, ramp, run, decel or stop
- Motor/cable connected or isolated during the symptom
- Visible board, option-card, module and connector identifiers
- Previous repair history, replacement parts and repeat-failure pattern